How to Start a Blog

Starting a blog is a great way to share your interests, your knowledge and your opinion on. A blog can also be something you use to write things you’ve learned or are learning, and it’s healthy too. Don’t worry too much about not having specific topics to write about, create your blog and start writing. In this post, we show you how to start a blog.
There are many ways to start and launch a blog. The easiest option is to have your blog hosted by a company like WordPress or Squarespace. There are other services but these are two of the most popular choices as they are both reliable and easy to use. Another option is to blog on a platform where all you need to do is write and nothing else. Platforms like Medium allow you to do this and many people do prefer that. However, I think having your own blog is still important and necessary.
The domain name
The first thing you need to do is register a domain name in case you don’t have one already.
Domain names help identify one or more IP addresses which are numbers used to identify a computer on a network. For example, the domain name ontechies.com represents an IP address. Domain names are used in URLs to identify particular Web pages. For example, in the following URL the domain name is ontechies.com.
http://ontechies.com/2015/09/12/how-to-choose-the-perfect-tablet/
Every domain name has a suffix that indicates which top-level domain (TLD) it belongs to. There are only a limited number of such domains. For example:
- com – commercial business
- gov – government agencies
- net – network organizations
- edu – educational institutions
- org – non-commercial organizations
- more…
While there are many places where you can find a domain name, one of my favorites for its simplicity and speed when searching is domize.com. This tool allows you to type a domain name (anything without spaces) and it will show you if it is available for purchase. For obvious reasons, it is better to find a domain name that is easy to remember. Once you find an available domain name, click the link to buy it or go directly to one of many registrars out there. For simplicity, reliability and price, we recommend you use GoDaddy. It is easy to use and their prices are competitive.
The blog
If you don’t want to go trough the trouble of doing all of this, both WordPress and Squarespace have the option to buy a domain name from them. But wanted to show you how you can find and buy a domain name in case you want to have more control over it, or end up using a different blogging platform.
To start your blog, let’s assume you decide on WordPress as the platform, and we highly recommend it. WordPress is what this blog uses and many, many more. WordPress offers an open source version which you can download and host it on any server you want. It also offers a hosted version, which allows you to start right away, it’s free and it is the easiest and overall the best way to start.
Head over to WordPress.com and find the link to create a blog. It should be very visible. WordPress enhanced its sign up process and it helps you go through the steps of signing up and creating your blog.
Once you finish with the sign-up process you will have a basic blog. Below is a screen shot of what WordPress dashboard looks like:

On the left column you’ll find access to all features and options WordPress.com offers. There are a few areas you would want to get familiar with as you will spend most of your time there. The Site Stats under Dashboard and the Posts section. In the beginning, you’ll spend some time on Appearance and Settings.
Posts and stats
The Stats section under the Dashboard offers more than just basic stats for your blog. In this section you’ll see summaries on your blog traffic, referrers, top posts and pages, search engine terms, clicks, and total number of posts, categories, tags, followers and shares.
The Posts section is the one you’ll end up using the most. This is where you can access all blog posts you have written and also where you can start new posts. The Add New post screen is very self-explanatory, it has an editor with many editing and styling options, and sections where you can add categories, format, tags, etc. It is also from this page where you can publish your post immediately, or set a schedule so it can be published later.
Appearance
In this section you can search, preview and install both free and premium themes. One thing you need to know is that with the WordPress.com hosted solution, you are limited to the functionality they offer and you cannot install any plugins. While this might be a deal breaker to many, most people wanting to setup their first blog are probably better off without extra plugins, at least in the beginning. As of today, I still have my personal blog hosted using WordPress.com without third-party plugins and it works for me. If you want to use any of the many plugins available for WordPress, you are going to need to download WordPress from here and host it yourself. If you decide to do this, one of the WordPress hosting companies we recommend is DreamHost.
Widgets and Menus
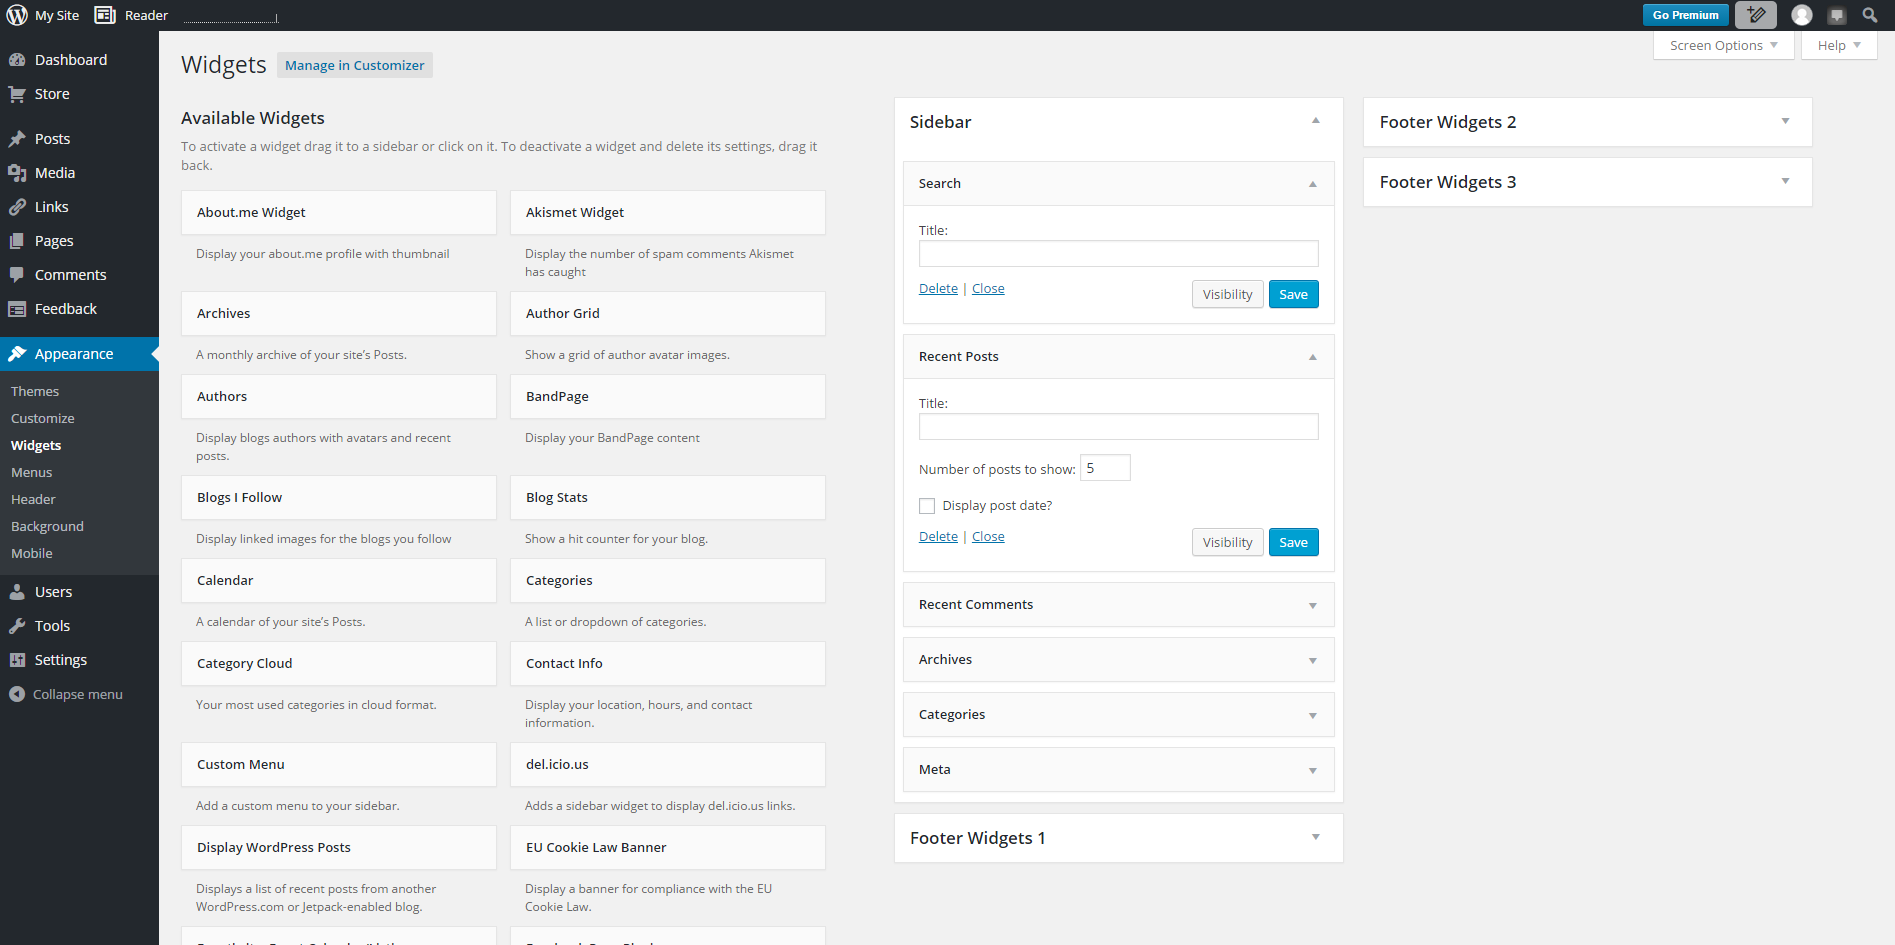
This section provides you with a lot of options to change the layout and functionality of your blog. Depending on the theme you chose, you’ll have different sections available to place widgets which are small bits of packaged code that offer functionality to your page. For example, there are widgets to display Categories, Search, Twitter Timeline, Tag Cloud, etc. The screen shot below shows you what this sections looks like, the widgets available and the sections in the blog where I can display these widgets.

To use any of these widgets, you drag them into one of the sections available for your theme and then click on the arrow pointing down to open the widget’s options. The screen shot above shows the Search and Recent Posts widget located in the Sidebar section of the blog with the options visible. This should give you an idea on how it works.
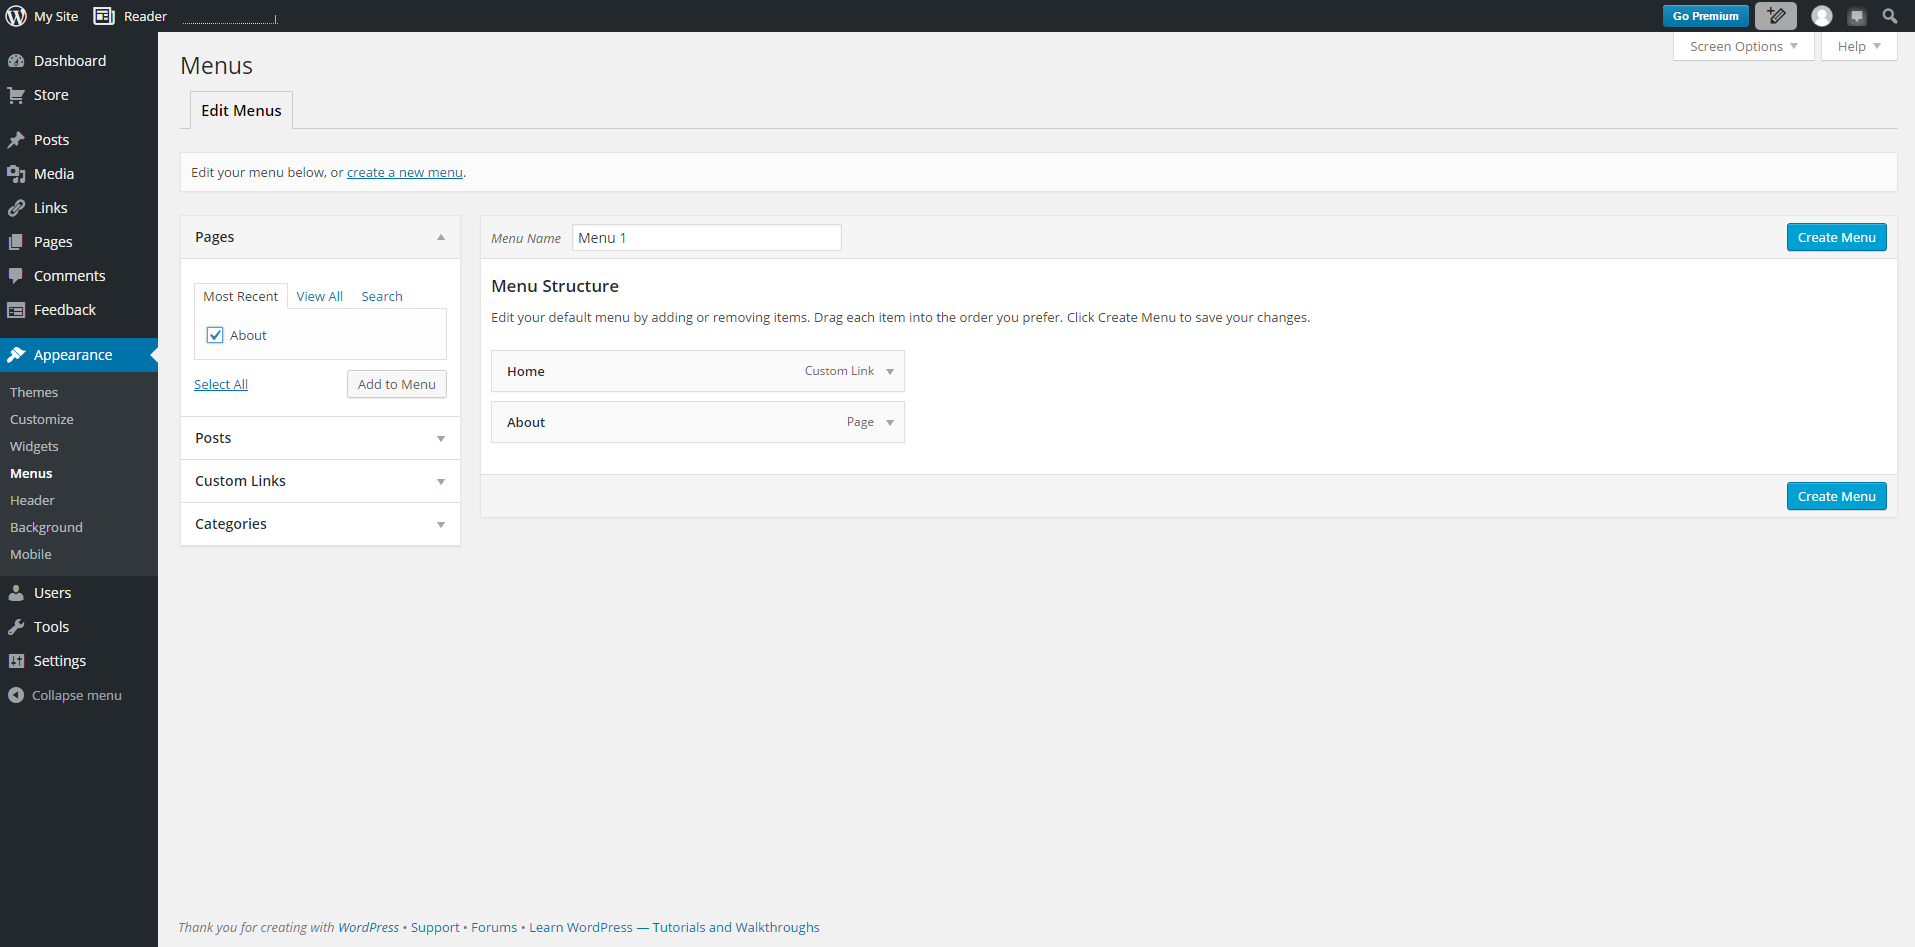
The Menu section lets you setup a menu and again, depending on the theme you select, you’ll have different options to display menus. For example, some themes are setup in a way to display different menus on the header and maybe the footer area of your blog.

As the image above shows, you have many options to add items to your menu. You can add pages you’ve created by checking the box and then click on Add to Menu. Following the same steps you can add links to posts, custom links, link to categories, etc to your menu.
Settings
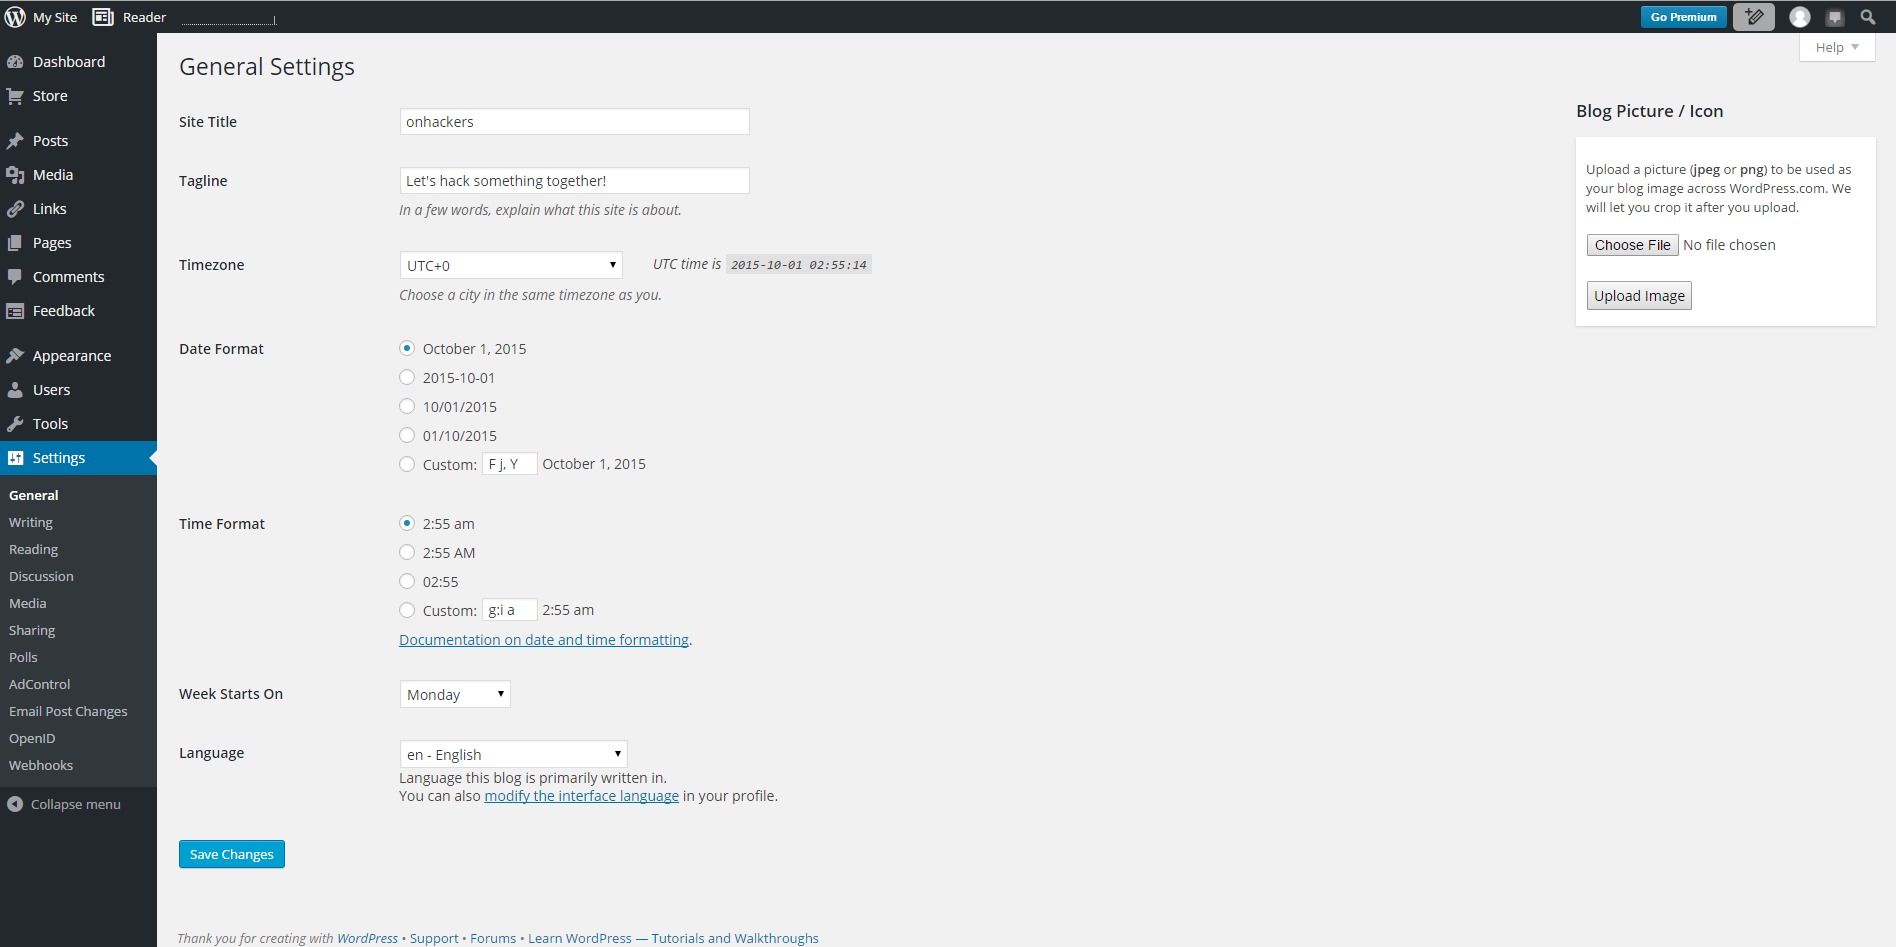
This section has options to change different settings as shown in the screen shot below. This is where you will change the title of your blog, timezone, language, comment’s options, follower settings, and sharing settings among other things.

There are many things more that WordPress offers. You don’t have to learn everything now, just start writing posts and get familiar with the platform.

Member discussion